Work independently or with the Kadenze team
When you have finished producing all your learning objects including filming and editing videos, you will work with the Kadenze team to upload your course.
Some authors prefer to upload their courses directly and so control the process whereas others choose to lean heavily on the Kadenze team and monitor progress for accuracy and flow.
Work with Kadenze to upload your course
If you’d like the Kadenze Team to upload your course content for you, you will need to provide us with Course Information and Session Information.
- Part One: All the general course information, which will be posted on the platform.
- Part Two: Session information. Here you will be invited to upload your videos and resources to a folder on Kadenze’s Google Drive. Clearly label each video and resource using the conventions below and add them to the appropriate folders.
Naming conventions
The naming convention of your videos and files need to correspond with the names of the sessions/activities on your Learning Pathway Builder. For example, they may look like this:
- Session One (name)
- Lesson/Video 1
- Resources #1 (document name)
- Lesson/Video 2
- Resources #2 (document name)
- Lesson/Video 3
- Session Two (file name)
- Lesson/Video 1
- Lesson/Video 2
- Lesson/Video 3
- Resources #3 (document name)
Upload your course content independently
We encourage you to upload your course content yourself, because this empowers you as the course author to take control of your course. Our system is easy to use. The Kadenze team will provide you with an on-boarding session to introduce you to the system.
The following information will guide you through the steps to upload your Micro-course to the platform. At any stage of this process, you can seek assistance from the Kadenze team.
To start
Kadenze staff will create your course shell, you will receive an email inviting you as the instructor of the course to log in.
Create a kadenze.com account, log in, go to My Courses -> Draft tab to view your micro-course.
Once you click on your Micro-course, you will be directed to the Course Dashboard where you have an overview of your course Sessions, Coursework, Student Submissions (to Gallery and Forum posts). From the Course Dashboard, view the Getting Started section to start building your Micro-course. Let’s start with the Syllabus.
Add content
Expand the sections below to view instructions for each content type.
Syllabus
What you will need:
- Your course description
- Your course logo / image
- A list of essential requirements for your course
How to Upload Syllabus:
The Syllabus section can be reached by going to Course Info -> Syllabus. Once in the Syllabus page, go to the Course Overview section to post your course description.
Upload the logo / image which will be the public face of your course.
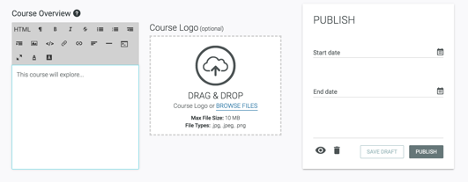
Scroll down to the “What You Need to Take This Course” section, list any necessary tools or requirements needed to complete the course.
Instructors
What you will need:
A short introduction to you, the instructor (no more than 400 words). When writing your biography, include your background, qualifications, experience and expertise as an educator and/or practitioner.
How to Upload Instructor Profile
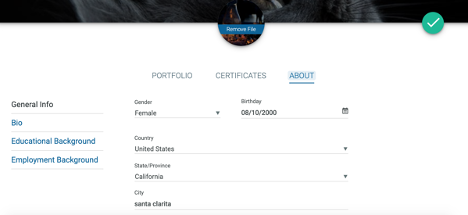
To update your Profile information simply click on your avatar in the upper right-hand corner of your screen and select Profile & Portfolio from the drop-down menu.
- Select the Pencil
- Fill out your name, bio, photo, social media links, employment background, and education history fields. NOTE: all fields are optional.
- Click on the Check Mark button to save your progress at any time.
Learning outcomes
What you will need:
You will have written Learning Outcomes as you prepared your course.
These learning outcomes give prospective students an overview of what they will achieve and help you to focus on the skills and capacities you want students to develop in your course.
Start each of your learning outcomes with a verb – to ensure the learning is active eg. “to observe and identify …” or “to apply …”. You can find examples of learning outcomes by exploring the courses on the kadenze.com platform.
You may well revise earlier, draft learning outcomes based on how your course has developed and matured. Learning outcomes will appear as text with an icon on the course certificate.
How to upload Learning Outcomes:
Click on “Add New” to post each of your three Learning Outcomes. Insert title and description of outcome. Visit the Learning Outcomes Repository and select a logo / image for each Learning Outcome. Then ->publish. The Learning Outcomes will appear on your course page.

Badges
It is up to you as the Course Author to decide whether you wish to make use of badges. They can be useful as a means of giving a student a sense of accomplishment when they complete a particular task or module which demonstrates achievement of a learning outcome.
What you will need:
Select which icons to use for your badges from the Badges Repository.
Note: these icons are in SVG format and can be viewed by opening in a browser.
How to Upload Badges:
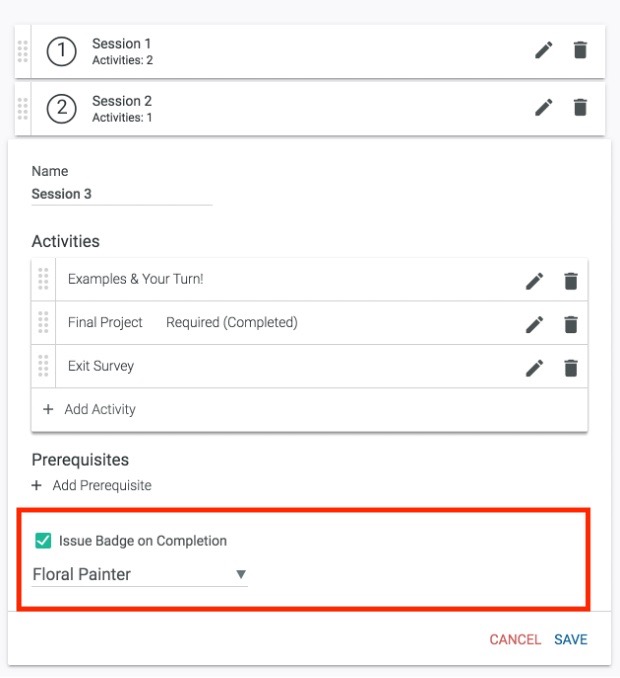
You can upload your Badge(s) under the Course Info -> Badges section. Click on the blue “+” icon to create a new badge. Type in a title and brief description and upload a visual icon to in relation to what the badge symbolizes.
For students to obtain badges, make sure you’ve first created Modules for your Micro-course. Go to the Modules tab in the Navigation Bar, then click the edit icon to find the Issue Badge on Completion option as seen in the image below. You will see options from the badges you’ve initially created, select one, then click Save.
Sessions
What you will need:
- A final version of each instructional activity you have included in your learning pathway
- The sequence of instructional activity which will make up each session and a title for each session
How to upload Sessions:
Go to Sessions -> Add New or select Sessions -> View All, then click on the blue “+” icon to open the Session builder.
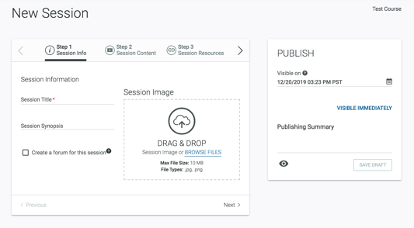
Once in the Session builder, follow the following four steps.
Step 1 involves writing the session title along with a brief description of the session under Session Synopsis. Upload a banner image for the session for the Session Image.
Step 2 you can upload your video lessons or other educational, course content. Click on Add Media, then upload or embed your content. Once your video content has been uploaded and processed, the video files will be arranged in drop-down menus to make edits for the video titles and have the option of adding subtitles. Use the Session Content section to include any additional information about the session.
Step 3 add any resources you would like to be included in the session.
Step 4 attach any assessment exercises you may have with that session.
NOW, select Save Draft on the right-hand side under the Publish box if you want to continue editing your Session at later times or select Publish if you are ready to publish the session to the world.
Coursework
Coursework is any assignment or task set for students to undertake, which is for grading. This is optional for Micro-courses, as grading is not a requirement. However, you can use the Coursework functionality and set grading at 100% based on completion of the task.
What you will need:
- Drafts or ideas for potential coursework assignments such as quizzes, projects to other course-related activities.
How to upload Coursework:
You will need to liaise with the Kadenze team for specific information relating to creation of surveys, quizzes or other assignments.
Modules
Modules enable you to create a visual representation of the learning pathways of each session (including coursework) in your course.
What you will need:
Publish all sessions and coursework included in your Micro-course.
How to upload Modules:
Go to the Modules tab, then select “Add Module.” In the New Module box, the modules will correspond with the number of Sessions in your Micro-course. For example, if you have two Sessions, the first module will be titled Session 1, then create a new module that will be titled Session 2. So, type the corresponding title into the New Module box.
Under the Activities tab, select the Session category, then select the corresponding session and click on Save. Make sure to create another section for coursework If you have any.
Announcements
What you will need:
- Write a brief Student Welcome Announcement that introduces students to your micro-course. Include a summary of what students can expect from taking your course, as well as any additional links to your social media pages and instructor websites.
- You can communicate at any time with all students using the Announcements
How to upload Announcements:
Go to Announcement -> Add New, create a title for your announcement, and write what you would like to include in the announcement under Message. In the Publish box, go to the “Send this Announcement When” drop down menu, then under the User Enrolls – After Course Begins. This means new students will automatically receive the Student Welcome Announcement once they’ve enrolled in the course. The course will be in adaptive mode, so the course will not have a set end date.
Feel free to create other announcements for your micro-course as needed.
Resources
What you will need:
The resources you will include in your course. Make sure each resource is in the form of a website link, downloadable document, scholarly or industry reference and so on
How to upload Resources:
Go to the Resources tab to upload the resources which will enrich the learner’s experience of your Micro-course.
Surveys
What you will need:
Draft the survey you want students to complete
How to upload Surveys:
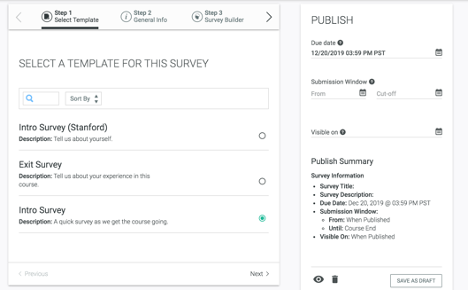
Go to the Surveys tab to create Intro and Exit Surveys for your course. Select Add New, Start From Template.

Select options titled Intro Survey and Exit Survey. Click on the Next button for Steps 2-4. Then go to Step 5 to publish the survey, select Publish button on the right-hand side.